
Properties Manager
Overview
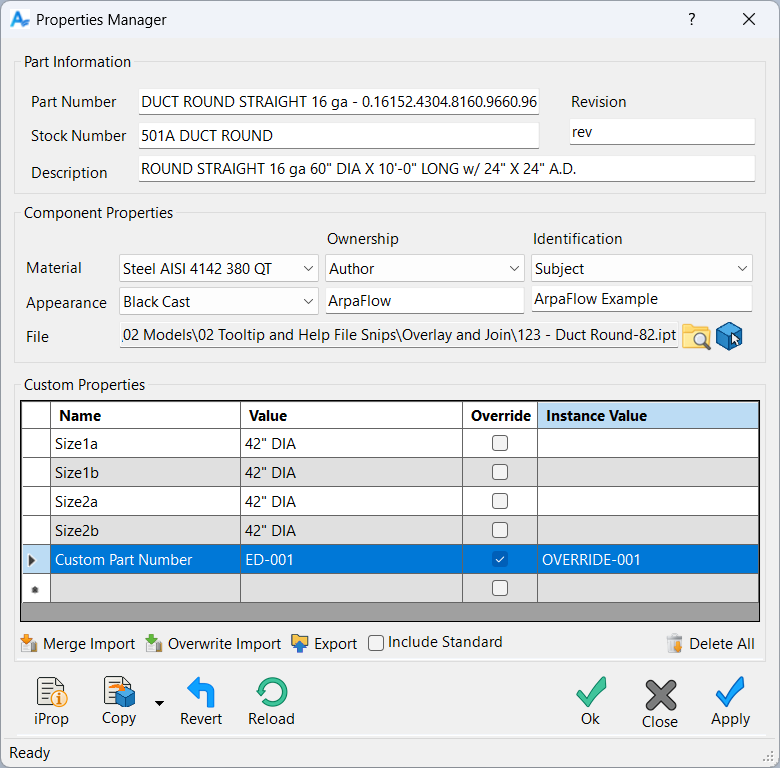
The Properties Manager is a unified workspace for viewing and editing the iProperties of a component in an Autodesk Inventor assembly. It brings standard properties, component-level values, and custom iProperties into a single dialog so you can manage a component’s metadata without opening multiple Inventor windows or switching between several tabs.
When the dialog opens, it loads the selected component and displays its part information, material and appearance settings, ownership and identification fields, and all user-defined custom iProperties. You can edit values directly, apply changes to the component, copy properties to other components, import or export property sets, and use snapshot tools to revert or reload values as needed.
Standard Properties
The Standard Properties section exposes the core iProperties that define a component’s identity and documentation fields. These values are stored on the component file and are used for BOM generation, drawing title blocks, and general project metadata. The Properties Manager reads these fields when a component is loaded and lets you edit them in one place.
Standard properties are grouped into Part Information and Component Properties. Part Information covers the common naming and revision fields, while Component Properties focuses on material, appearance, ownership, identification, and file path. Edits made here are written back to the component when you apply or save changes.
Part information
The Part Information group contains the most commonly referenced fields used for identification and documentation: Part Number, Stock Number, Description, and Revision. Part Number and Stock Number are typically used for BOM entries, and ordering references. Description provides a human-readable summary of the component, while Revision indicates the current revision or version level.
You can edit these values directly in the Part Information group. When you apply or confirm changes, the Properties Manager updates the component’s standard iProperties. These fields are shared with Inventor’s native iProperties dialog, so any edits you make here are immediately reflected in BOMs, drawings, and other downstream tools that depend on these values.
Component properties
The Component Properties group focuses on characteristics that describe how the component behaves and is identified within a project. It includes the material and appearance assigned to the component, ownership-related information, identification fields, and the full file path of the active document. These values help define both the physical and administrative aspects of the component.
Material and appearance control the physical properties and visual style of parts, while ownership and identification fields are used to track authorship, project context, and classification. The file path display shows where the component is stored on disk and provides access to file-related tools, such as opening the folder or switching to a different component.
Ownership fields
Ownership fields group together iProperties that describe who is responsible for a component and where it comes from. The Ownership dropdown lets you choose which category to view, such as Author, Company, Designer, Engineer, Manager, Authority, Manufacturer, or Vendor. The associated text box displays the current value for the selected category and lets you edit it directly.
Each ownership category maps to a specific iProperty on the component. For example, Author and Company correspond to the Project or Summary fields in Inventor’s iProperties, while Manufacturer and Vendor are commonly used for supply chain or catalog references. Changing a value in the Ownership fields updates the corresponding iProperty when changes are applied.
Identification fields
Identification fields group together iProperties used to classify and organize components within a project. The Identification dropdown provides access to categories such as Project, Title, Subject, Category, User Status, and Keywords. Selecting a category shows its current value in the text box, where you can review or edit the content.
These fields are often used for project tracking, search filters, or grouping components by function, status, or discipline. When you edit an identification value and apply changes, the Properties Manager writes the new value to the corresponding iProperty, keeping the component’s metadata aligned with your project standards.
Material and appearance
The Material and Appearance fields control the physical and visual properties of part components. Material selects from the part’s available material definitions, affecting mass properties and other downstream calculations. Appearance defines the visual style used to display the component in the graphics window, such as color, finish, or texture.
When you select a material, Inventor may automatically assign a default appearance based on material settings. You can override this by explicitly choosing a different appearance in the Appearance list. These settings are available when the active component is a part file and are updated on the component when you apply or save changes.
File path and component selection
The file path display shows the full path to the active component file on disk. This gives you immediate visibility into where the component is stored, which is especially helpful when working with libraries or large project structures. The field is read-only and updates automatically when you switch to a different component.
The Open File Location button opens Windows Explorer with the component file selected, allowing you to inspect the folder, manage versions, or work with related files. The Pick Component button lets you select a different component in the graphics window and load its properties into the dialog. If there are unsaved changes, the Properties Manager prompts you to apply or discard them before switching, ensuring that you do not lose edits accidentally.
Custom Properties
The Custom Properties section provides a dedicated grid for managing user-defined iProperties on the active component. These properties are commonly used for project-specific metadata, manufacturing details, configuration values, and any other information that does not fit into standard iProperty fields.
Each row in the grid represents a single custom property, including its name, default value, an override flag, and an optional instance-specific value. Edits made in the grid are held in the dialog until you apply or save changes, giving you a controlled environment for reviewing and updating custom metadata.
Custom properties grid
The Custom Properties grid lists all custom iProperties defined on the component. Columns include the property Name, Default Value, an Override checkbox, and an Instance Value field. The grid supports row selection, cell editing, and basic navigation using the keyboard or mouse, making it easy to review multiple properties at once.
Each row corresponds directly to a property stored on the component. When you change a value in the grid and apply changes, the Properties Manager updates the underlying custom iProperty on the component file or its instance, depending on the override settings.
Property name
The Name column defines the name of the custom iProperty. Names must be unique and non-empty for each component. To rename a property, edit the text in the Name cell for that row. The Properties Manager checks for duplicates and invalid names before allowing changes to be applied.
Renaming a property updates the corresponding custom iProperty on the component when you apply changes. If a new name conflicts with an existing property, the dialog highlights the issue and prompts you to resolve it before proceeding, helping you maintain a clean set of custom fields.
Default value
The Default Value column stores the standard value for the custom property on the component definition. This value is shared by all occurrences of the component unless an instance override is enabled. You can edit the Default Value directly in the grid, and the change will be written to the component when you apply or save.
Default values are ideal for properties that should be consistent across all uses of a component, such as a general specification, classification, or default configuration setting. If no override is active for a given instance, this default value is the one reported by Inventor.
Override checkbox
The Override checkbox determines whether the property uses an instance-specific value for the current occurrence. When the checkbox is cleared, the Instance Value is ignored, and the occurrence uses the Default Value stored on the component definition. When the checkbox is selected, the Instance Value becomes active for the current occurrence.
Enabling an override creates or updates an instance property for the selected occurrence in the assembly. Disabling it removes or ignores the instance override, reverting the occurrence to the default value. This gives you precise control over when individual occurrences deviate from the standard property value.
Instance value
The Instance Value column holds the value used when an override is enabled for the current occurrence. This value applies only to the selected occurrence in the assembly and does not affect the default value or other occurrences. The field is editable when the Override checkbox is selected and read-only when overrides are disabled.
Instance values are useful for distinguishing otherwise identical components that need unique tracking information, labels, or configuration details. When you apply changes, the Properties Manager writes the instance values as occurrence-specific properties in the assembly.
Adding, renaming, and deleting properties
You can add new custom properties by entering a name in a new row of the grid and supplying a default value. Existing properties can be renamed by editing the Name cell and updated by changing the Default Value or override settings. To remove a custom property entirely, delete its row from the grid.
Changes to names, values, and overrides are staged in the dialog until you apply or save them. When you apply changes, the Properties Manager creates, updates, or removes the corresponding custom iProperties on the component. This lets you experiment with property changes before committing them to the file.
Validation rules
The Properties Manager validates custom property definitions to maintain a consistent and usable set of fields. Property names cannot be blank and must be unique within the component. If you attempt to apply changes with duplicate or empty names, the affected cells are highlighted, and you are prompted to correct the issues.
Additional checks may be applied to ensure that values are compatible with Inventor’s property storage. These validation rules help prevent conflicts, reduce errors, and keep your custom property set organized across components and assemblies.
Instance override behavior
Instance overrides are stored as properties on the specific occurrence of a component in the assembly. When the Override checkbox is checked, the Properties Manager creates or updates this instance property using the value in the Instance Value column. When the checkbox is cleared, the instance override is removed or ignored, and the default value is used instead.
This behavior allows you to mix shared defaults and unique instance values within the same assembly. The Properties Manager ensures that override settings are applied consistently by updating the relevant occurrence-level properties whenever you confirm changes.
Delete all custom properties
The Delete All command clears all custom property rows from the grid in the current dialog session. This is useful when you want to reset the custom property set or replace it entirely using an import operation. After using Delete All, you can add new properties manually or import them from a property file.
Deleting properties from the grid does not immediately remove them from the component. The changes are committed only when you click Apply or OK. This gives you a chance to review the impact of a mass deletion before saving the updated state to the component file.
Import and Export
The Properties Manager includes an import and export system for transferring property data between components. You can reuse standardized property sets, synchronize metadata across projects, and share configurations with other team members. Import and export tools operate through the toolbar beneath the Custom Properties grid.
Imports can merge or overwrite existing properties, and exports capture the current set of standard and custom properties, including instance overrides. This gives you a flexible way to manage property packages without re-entering information manually for each component.
Merge import
The Merge Import command reads property data from an external file and combines it with the properties currently shown in the grid. Existing properties are updated if they appear in the file, and new properties are added if they do not already exist on the component. Properties that are not present in the file are left unchanged.
Merge Import is ideal when you want to supplement or update a component’s properties without removing anything. When the Include Standard option is enabled, standard iProperties such as part information and ownership fields are also updated as part of the merge.
Overwrite import
The Overwrite Import command replaces the current set of custom properties with those from the imported file. Properties in the file are added or updated, and any custom properties not present in the file are removed from the grid. This provides a way to enforce a standardized property set or reset a component to a known configuration.
When Include Standard is enabled, standard iProperties are also overwritten with values from the file. Overwrite Import should be used when you are confident that the imported file represents the desired final state for the component’s properties.
Include standard properties
The Include Standard option controls whether standard iProperties are included in import and export operations. When this option is selected, fields such as Part Number, Description, Revision, and selected ownership and identification values are transferred along with custom properties.
When the option is cleared, only custom properties and any instance overrides are affected by import and export. This allows you to protect standard metadata while still using shared files to manage custom property sets.
Export properties
The Export command creates a file that contains the current set of properties from the dialog, including custom iProperties, instance overrides, and, if selected, standard properties. The exported file can be used as a template for new components, shared with other users, or stored with project documentation.
Exporting does not modify the component; it simply captures the current values for later reuse.
Exported data contents
Exported data includes standard properties (when Include Standard is enabled), custom property names and values, and any instance overrides that are active in the current component context. The file structure is designed to be compatible with both Merge and Overwrite imports.
By keeping these contents consistent, the Properties Manager allows you to move property sets between components and projects with predictable results, ensuring that your standardized metadata remains intact.
Copy Properties to Other Components
The Properties Manager includes copy tools that apply selected groups of properties from the active component to other components in the assembly. These commands help you synchronize metadata across multiple parts without editing each one individually.
When you choose a copy option, the dialog prompts you to select target components in the graphics window. After selection, the chosen properties are written directly to each component, and a confirmation appears in the status bar.
Copy part information
Copy Part Information transfers the key identification fields from the Part Information group: Part Number, Stock Number, Description, and Revision. These values are applied to each selected component, replacing their existing values.
This option is useful when standardizing naming and revision data across a group of similar components or when aligning multiple parts to a shared documentation scheme.
Copy component properties
Copy Component Properties applies the component-level fields from the active component to the selected targets. This includes material, appearance, and ownership and identification values managed in the Component Properties group.
Use this option when you want multiple components to share the same project context, authorship details, or visual and material settings, without affecting their part numbers or descriptions.
Copy custom properties
Copy Custom Properties transfers all user-defined custom iProperties from the active component to the selected components. This includes property names and default values, as well as any instance overrides defined for the current context where applicable.
This option is ideal for propagating a standardized set of custom metadata across multiple components, ensuring that all parts share the same extended property structure.
Copy all properties
Copy All Properties combines the behavior of the other copy modes and transfers all standard, component, and custom properties from the active component to the selected components. This includes part information, material and appearance, ownership and identification fields, and custom iProperties.
Use this option when you want the selected components to fully match the active component’s property set, effectively cloning its metadata across multiple parts.
Selection workflow
After choosing a copy command, the Properties Manager enters a selection mode in the graphics window. You can select one or more components to receive the copied properties. When you finish selecting, the copy operation is executed, and a status message confirms completion.
The selection workflow is designed to be quick and visual, allowing you to pick components directly in the assembly rather than through a list. This is especially helpful in complex assemblies where spatial relationships guide your choice of targets.
Snapshots and Reverting
The Properties Manager uses a snapshot system to capture the state of a component’s properties when the dialog is first opened. This snapshot includes standard properties, ownership and identification fields, material and appearance, and all custom properties, including instance overrides.
Snapshot tools let you revert to this original state or reload the current values from the component file, giving you safe options for undoing changes or synchronizing with external edits.
Snapshot contents
When the Properties Manager loads a component, it records the values of all relevant properties: part information, component properties, ownership and identification fields, custom properties, and any active instance overrides. This collection of values forms the snapshot for the session.
The snapshot is used as a reference point for the Revert command, allowing you to restore the component to its original state at any time during the session.
Revert to original state
The Revert command restores all fields in the dialog to the values stored in the snapshot. Once reverted, these values are written back to the component when the operation completes, effectively undoing any changes made since the dialog was opened.
Revert is useful when you have experimented with property changes and decide to discard them entirely, returning the component to the state it had when you first opened the Properties Manager.
Reload from component
The Reload command refreshes the dialog using the current values stored in the component file, regardless of the original snapshot. Any unsaved edits in the dialog are discarded, and the fields are updated to match the component’s latest saved state.
Reload is helpful when the component has been modified from outside the Properties Manager, such as through Inventor’s native iProperties dialog or another tool, and you want the dialog to reflect those changes.
Update tracking
The Properties Manager tracks whether properties have been modified during the current session. When changes are detected, the dialog treats the data as “revised” and prompts you before closing or switching components.
This behavior helps prevent accidental loss of edits by warning you when there are unsaved changes. You can choose to apply, discard, or cancel the operation, ensuring that you remain in control of when property updates are committed to the component.
Commands
The Properties Manager toolbar provides commands for opening external dialogs, copying properties, reverting or reloading values, and controlling how changes are applied and the dialog is closed. These commands are designed to support a clear, predictable workflow while editing component properties.
Each command operates immediately when selected, and any effects on the component are reflected in the dialog or the Inventor environment once the operation completes.
Open iProperties
The iProp command opens Autodesk Inventor’s native iProperties dialog for the active component. This allows you to view and edit fields that may not be exposed directly in the Properties Manager.
When you close the iProperties dialog, the Properties Manager reloads the component’s properties so that any changes made in the native dialog are reflected in the grid and standard fields.
Copy commands
The Copy split-button provides quick access to the four copy modes: Copy Part Information, Copy Component Properties, Copy Custom Properties, and Copy All Properties. Each mode determines which groups of properties are transferred from the active component to selected targets.
After selecting a copy mode, you pick target components in the graphics window, and the chosen properties are applied immediately. For more detail on what each mode includes, see the “Copy Properties to Other Components” section.
Revert
The Revert command restores all properties in the dialog to the original snapshot captured when the component was first loaded. The restored values are written back to the component, effectively undoing all edits made during the current session.
Use Revert when you want to discard all changes and return the component to its starting state in this Properties Manager session.
Reload
The Reload command discards unsaved edits and refreshes the dialog from the component’s current saved state. Unlike Revert, it does not use the original snapshot; instead, it reflects whatever values are currently stored in the file.
Reload is appropriate when the component has been modified externally or when you want to abandon pending changes and sync with the latest saved properties.
Apply
The Apply command writes all current values from the dialog to the component without closing the window. This allows you to commit changes in stages, review the impact in the model, and continue editing additional properties.
Apply is useful when you want to keep the Properties Manager open as a control center while making incremental updates to the component’s properties.
Close
The Close command exits the Properties Manager without explicitly committing changes. If there are unsaved edits, the dialog prompts you to apply or discard them before closing, ensuring that you do not lose changes unintentionally.
Choose Close when you are finished working with the dialog and do not need to immediately confirm another set of changes.
OK
The OK command applies all current changes and then closes the Properties Manager. It combines the effect of Apply and Close in a single action, confirming your edits and exiting the dialog.
Use OK when you are satisfied with the current property values and ready to return to working directly in the Inventor environment.
Component Switching and File Tools
The Properties Manager includes tools to switch between components and access the underlying file system location for the active component. These features support workflows where you need to move through multiple components or inspect the file structure without leaving Inventor.
Component switching and file tools are tightly integrated with the dialog’s state management so that unsaved changes are handled safely whenever the active component or document changes.
Pick component
The Pick Component button lets you select a different component directly in the graphics window. When you click the button, the dialog waits for you to choose a component in the assembly and then loads its properties into the Properties Manager.
If there are unsaved changes for the current component, the dialog prompts you to apply or discard them before switching. Once the new component is selected, the dialog updates all standard and custom fields to reflect the new context.
Open file location
The Open File Location button opens Windows Explorer with the active component’s file highlighted. This provides quick access to the folder where the component is stored, making it easy to manage versions, inspect related files, or verify that the file is located in the correct project directory.
This command does not modify the component; it simply launches the file explorer and selects the corresponding file on disk.
Examples
Below are several examples that demonstrate common workflows in the Properties Manager. Each one shows how to perform a typical task using the tools and options described in this help topic.
Example 1 – Edit and apply custom properties
To edit custom properties for a component, begin by selecting the component in the assembly and opening the Properties Manager. In the Custom Properties grid, locate the property you want to change and edit its value directly in the Default Value column. If the property should have a unique value for this specific occurrence, enable the Override checkbox and enter the instance-specific value in the Instance Value column. After making your changes, click Apply to write the updated values to the component without closing the dialog. This allows you to review the results in the model and continue editing additional properties as needed.
Example 2 – Copy properties to multiple components
To copy properties from one component to others in the assembly, load the source component into the Properties Manager and choose one of the copy options from the Copy split-button. When prompted, select the target components directly in the graphics window. The selected properties are written to each component immediately, and a confirmation message appears in the status bar. This workflow is useful when standardizing metadata across similar components or applying a consistent set of custom properties throughout an assembly.
Example 3 – Import and merge property sets
To reuse a saved property set, open the Properties Manager for the component you want to update and select the Merge Import command. Choose the file containing the property data, and the dialog will update the grid with any matching properties while adding new ones that were not previously present. Standard properties are included if the Include Standard option is enabled. After reviewing the imported values, click Apply or OK to commit the changes to the component. This approach is ideal for applying standardized property templates across multiple projects.
Example 4 – Revert a component to its original state
If you want to discard all edits made during the current session, use the Revert command. This restores the dialog to the snapshot captured when the component was first loaded and writes those original values back to the component. Revert is helpful when experimenting with changes or reviewing alternative property configurations. If you only want to discard unsaved edits without returning to the original state, use Reload instead to refresh the dialog with the component’s current saved values.